My family does NOT buy pie crusts (we're actually quite snobby about our pies), but I've always made pumpkin pie with canned pumpkin, and it always tastes great.
 That's what some people call "making it from scratch"...I suppose "not from scratch" would be buying it at the store?
The great pumpkin pie experiment of 2009 took place at my brother and sister-in-law's house this week. Leah and I have both always thought it would be fun to attempt pumpkin pie making sans the Libby's can (read: actually from scratch...real scratch!), so we went for it on Wednesday before the family gathered for Thanksgiving on Thursday.

What transpired was both easier and better tasting than I expected. Literally, this is the best pumpkin pie I've ever had. The key is to food process the heck out of the ingredients (either pumpkin + egg for enough liquid or the whole recipe before pouring into the pie shell).
Here's the recipe (adapted from All Recipes, makes one pie)
This is what we did:
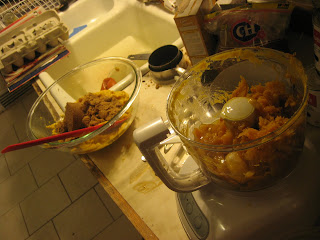
- Cut sugar (pie) pumpkin in half and remove seeds. Place cut side down on a cookie sheet lined with lightly oiled aluminum foil. Bake at 325 degrees F for ~45 minutes, or until the flesh is tender when poked with a fork. Cool until just warm. Scrape the pumpkin flesh from the peel. Puree in 2 batches in a food processor (you may need to put the eggs in so that there is enough liquid to process very smoothly - that's what I did) .
- In a large bowl, slightly beat eggs. Add brown sugar, flour, salt, 2 cups of the pumpkin puree, spices, and evaporated milk. Stir well after each addition. Whisk the ingredients until NO chunks are present (the flour clumped up for us, but a whisk did the trick).
- Pour mixture into the pre-baked (see recipe below) pastry shell. Place a strip of aluminum foil around the edge of the crust to prevent over browning (this is key).
- Bake 15 minutes at 450 degrees F, then reduce the oven temperature to 350 degrees F. Bake an additional ~40 minutes, or until a toothpick inserted near the center comes out clean. Remove the strip of foil about 20 minutes before the pie is done so that the edge of the crust will be a light golden brown (if needed - it may brown enough in the pre-bake of the crust). Cool pie, and refrigerate overnight for best flavor.
- Please use REAL whip cream (and add a little vanilla, if you like) to top with...it's so much better!
Pie crust recipe (my grandma's famous, makes two crusts):
2 cup flour
2/3 shortening (vegetable or butter flavor)
1/4 cup cold water
1 tsp salt
1. Cut the shortening, flour and salt together using a pastry blender until mixed.
2. Add the water in tablespoons while mixing (with your fingers or pastry blender) until moistened.
3. Ball the dough up firmly, then carefully roll out on a flat surface. Leah is great at this: she rolls once, then flips the dough, then back again, etc. so that it doesn't stick to the counter and gets enough flour on both sides.
4. Pick up the dough by loosely rolling it over your rolling pin and place in pie pan (glass pie pans are the best)
5. Gather up edges and make pretty (see picture).
6. Pre-bake pie shell in oven at 350 F for about 10 - 15 minutes. This will make sure your pie crust doesn't get soggy when pumpkin is added.


whoa Katie!!! what an awesome looking pie! AMAZING!!!
ReplyDeletethanks! it was SO good. i can't even explain it. worth the cooking and processing steps, without a doubt!
ReplyDelete